
When homeowners think about a new garage floor, they usually focus on color, flakes, or how glossy it looks.
But the truth is—the most important part of any garage floor is what you don’t see.
It’s the moisture barrier.
If this step is done wrong—or skipped entirely—the entire floor system can fail, no matter how good it looks on day one.
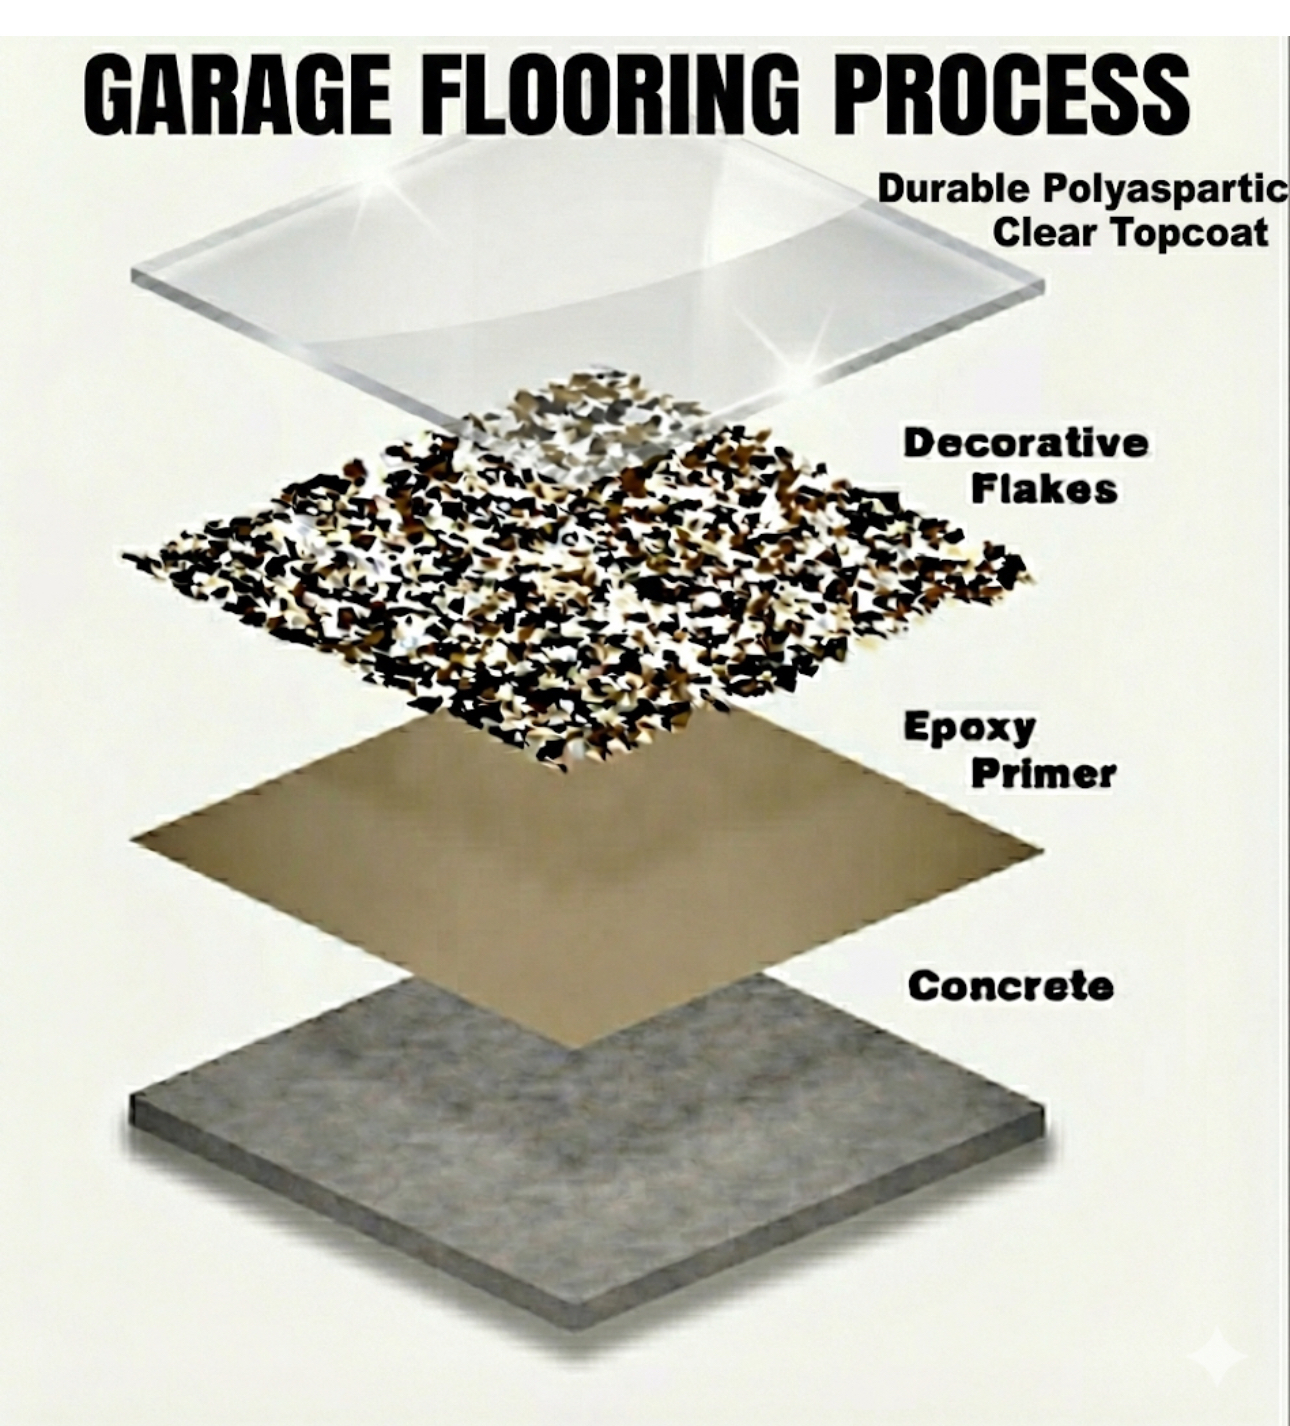
First, Let’s Understand the Full Flooring Process
Before diving into moisture, here’s a quick overview of a professional garage floor system:
👉 For a detailed look at our full installation system, visit our garage flooring page
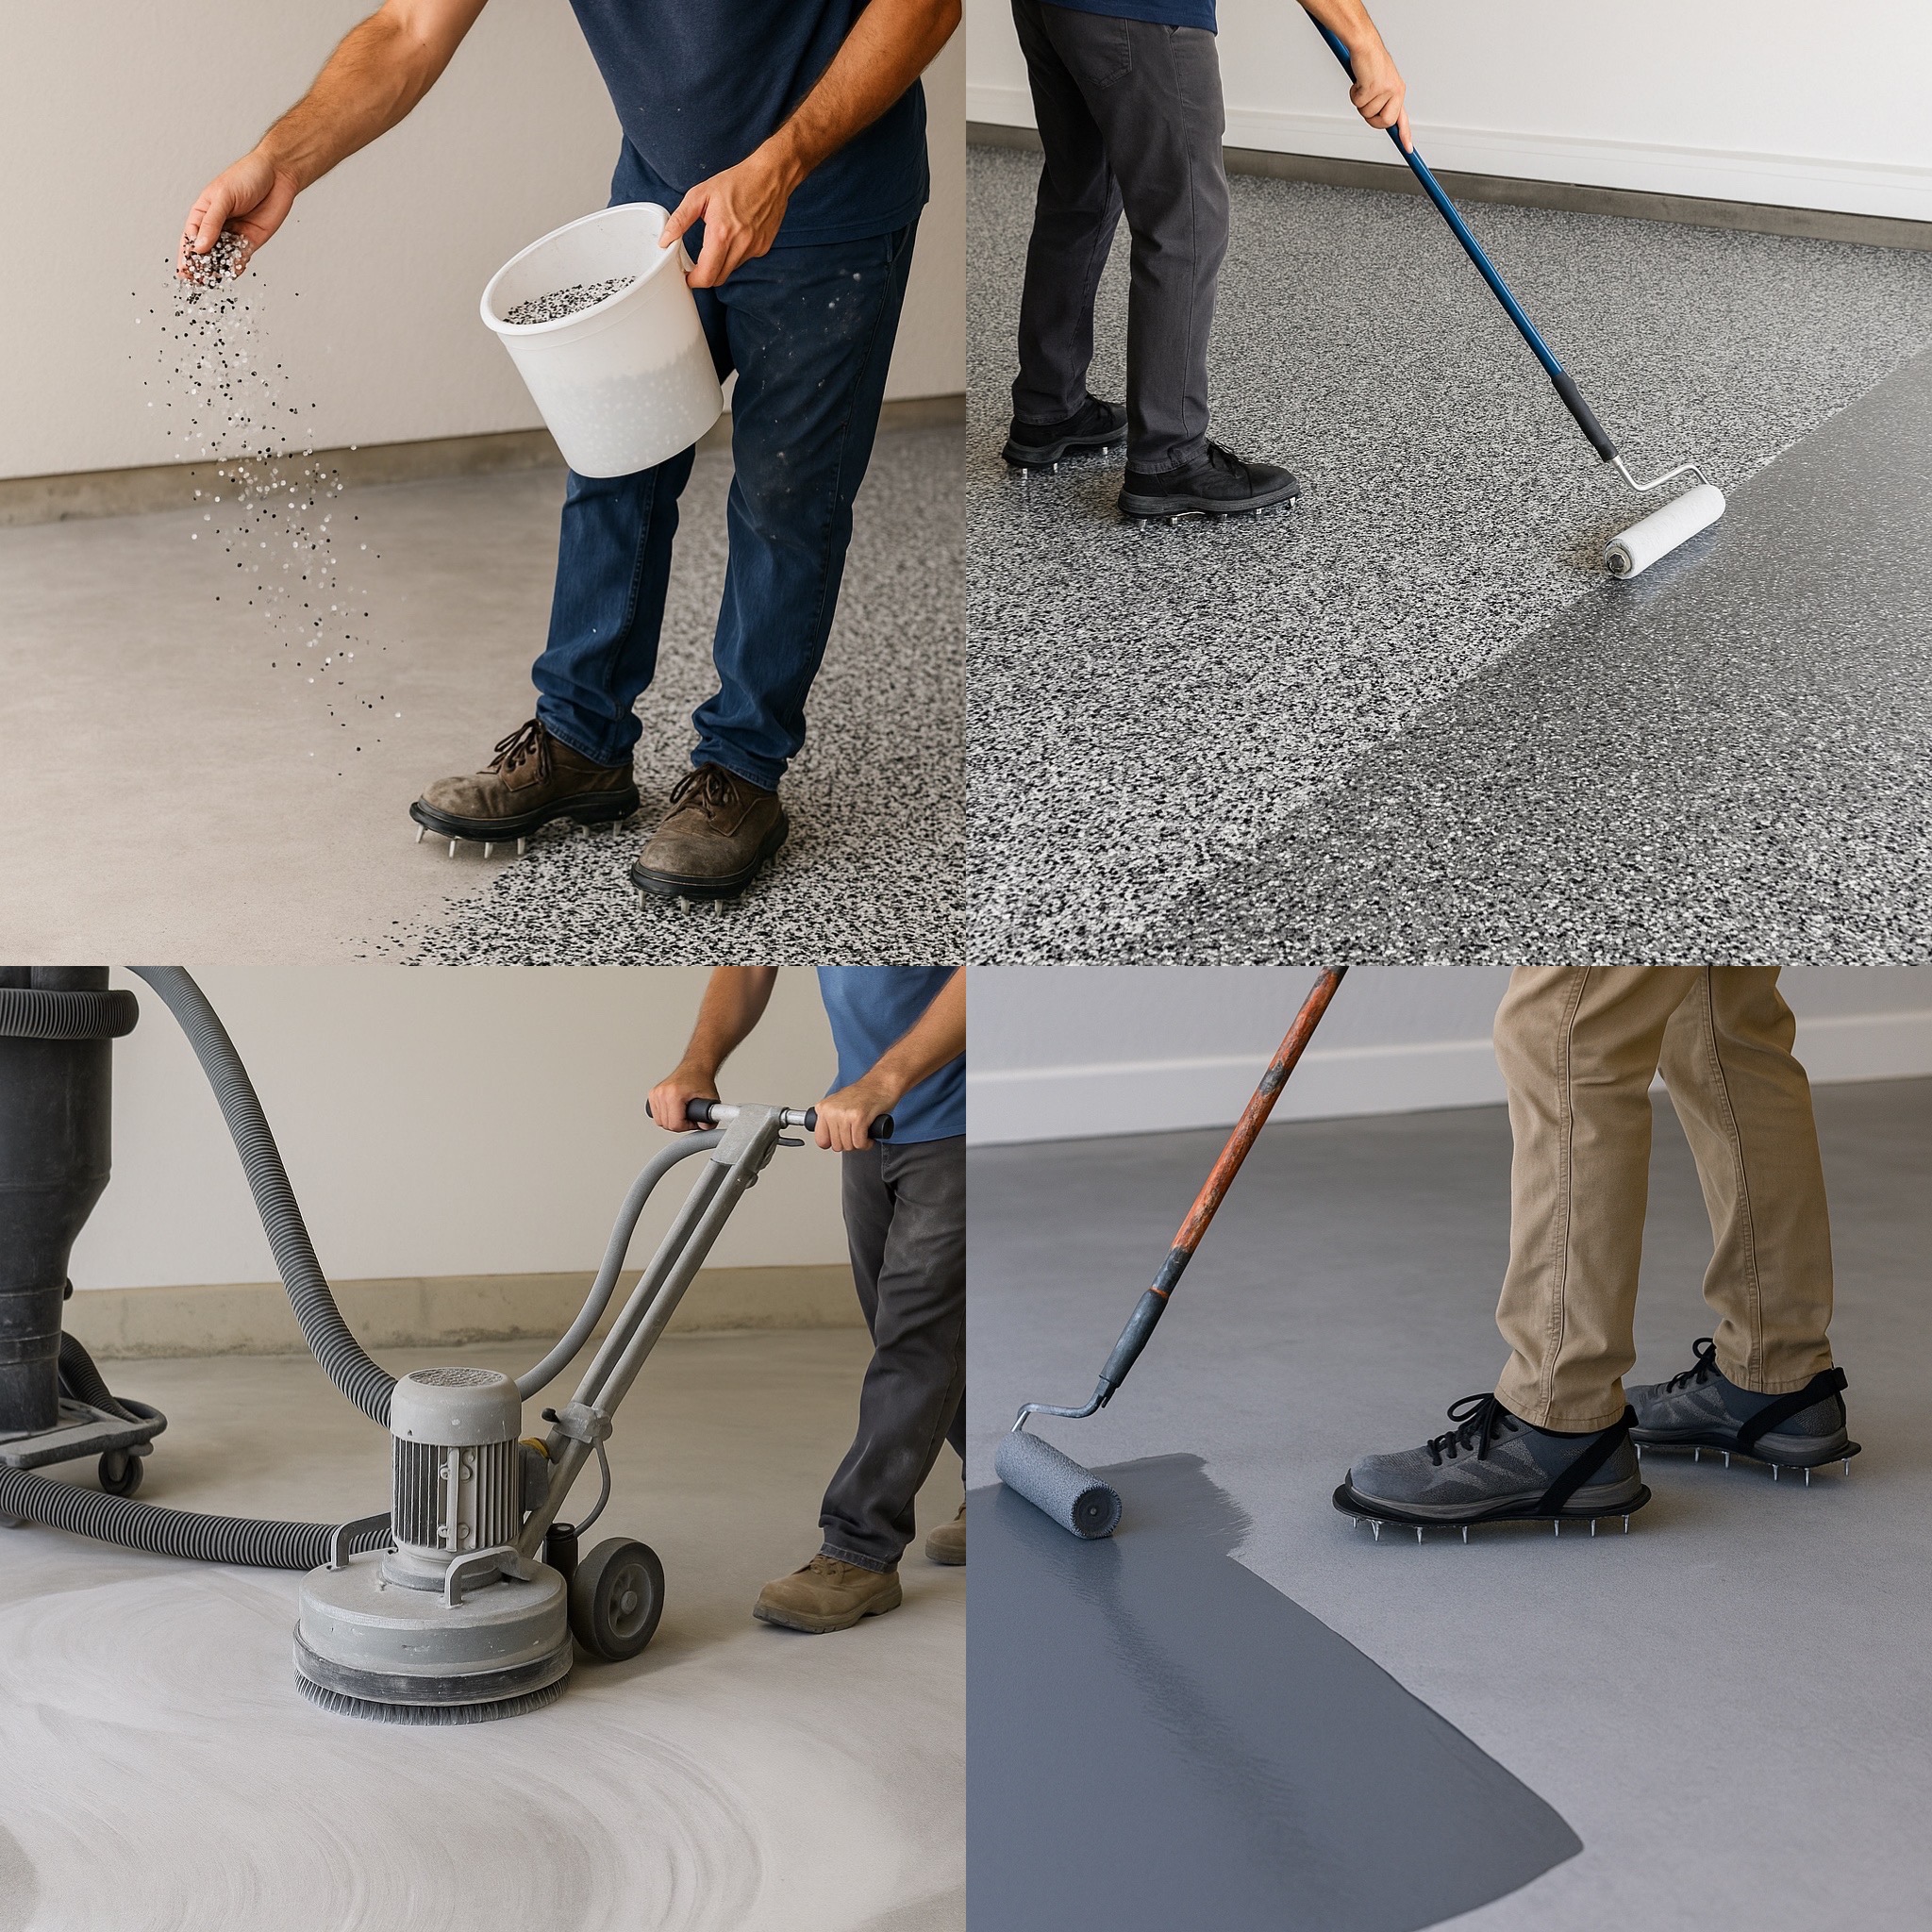
- Grinding the concrete — opens the surface and removes old coatings
- Applying epoxy base primer coat — penetrates the concrete, creates a strong bond, and acts as the primary moisture barrier
- Broadcasting color decorative flakes — adds texture and slip resistance
- Scraping and removing excess flakes — creates a uniform surface
- Applying polyaspartic topcoat — seals and protects the system
You can also see how these principles apply in real projects by exploring our recent garage makeover case studies
Concrete Is Not Solid — It’s Like a Sponge
Most homeowners are surprised to learn this:
Concrete is porous.
It contains tiny channels that allow moisture to travel from the ground below up through the slab.
This process is called moisture vapor transmission (MVT).
That’s also why:
- Garage floors feel cool to the touch
- Moisture is constantly moving—even if the surface looks dry
In South Florida, this is especially important due to:
- High water tables
- Humidity
- Older homes without proper vapor barriers
How Moisture Destroys Garage Floors
If moisture is not properly controlled, it will eventually cause failure.
1. Adhesion Failure
Moisture pressure pushes coatings away from the concrete
→ Floor starts peeling
2. Blistering & Bubbling
Moisture carries salts that get trapped under coatings
→ Creates bubbles and soft spots
3. Surface Damage
Concrete weakens over time
→ Flaking, dusting, or crumbling
4. Efflorescence (Warning Sign)
White powdery residue on the surface
→ Clear evidence of moisture movement


How We Detect Moisture Problems
Before installing a floor, we look for warning signs:
- White powder (efflorescence)
- Peeling or failed coatings
- Flaking or distressed concrete
- Dark or damp areas
If needed, we perform a Calcium Chloride Test (ASTM F1869):
- Measures moisture vapor emission rate (MVER)
- Expressed in lbs per 1,000 sq ft over 24 hours
- Test runs for ~72 hours
- Must be done under normal living conditions
👉 ASTM Reference: https://www.astm.org/f1869
Typical South Florida readings:
- 3–5 lbs = normal
- Above that = elevated moisture risk
Our Standard Moisture Protection (Built Into Every Floor)
We use a high-performance epoxy base primer as the foundation of the system.
Why epoxy?
- Penetrates into the concrete
- Creates a strong mechanical bond
- Acts as a moisture barrier up to 16 lbs
- Recommended by leading manufacturers such as Sika, Euclid Chemical, Master Builders Solutions, and other top coating companies as the proper system for moisture control and adhesion
This is critical:
Most floors fail because this step is weak or skipped.
Additional advantage:
- 100% solids → very low odor, minimal fumes
- No shrinkage during cure
When Extra Protection Is Required
Sometimes, moisture levels are too high—even for epoxy.
Signs this is needed:
- Heavy efflorescence
- Large areas of coating failure
- Visible concrete deterioration
- High moisture test results (>16 lbs)
Advanced Moisture Barrier System (When Needed)
When moisture is excessive, we apply a dedicated moisture mitigation system from:
👉 Koster
Koster moisture barrier brochure: https://www.kosterusa.com/files/us_en/KOSTER-VAP-Brochure.pdf
Process:
- Grind the concrete
- Apply Koster moisture barrier
- Allow overnight cure
- Apply epoxy base primer
- Continue full flooring system
This adds one additional day, but ensures:
- No peeling
- No bubbling
- Long-term durability
Important Industry Insight: Polyaspartic Alone Is NOT a Moisture Barrier
Polyaspartic is an exceptional topcoat—but it is not designed to act as a primary moisture barrier when applied directly to concrete.
Industry Standards for Polyaspartic Coatings on Concrete
For professional-grade installations, controlling moisture vapor is a required best practice to prevent failure.
1. The Primary Standard: ASTM F1869
The industry-recognized benchmark for impermeable coatings is:
ASTM F1869 — Calcium Chloride Test (MVER)
https://www.astm.org/f1869
- The 3-lb Threshold:
Polyaspartic should not be applied directly unless moisture is:
👉 3 lbs or less per 1,000 sq ft over 24 hours
- The Science:
Polyaspartic forms an impermeable seal.
If moisture exceeds this:
- Vapor pressure builds beneath the coating
- Leading to:
- Blistering
- Clouding
- Peeling
2. Industry Association Guidance
- ICRI (International Concrete Repair Institute)
https://www.icri.org - SSPC / AMPP (Association for Materials Protection and Performance)
https://www.ampp.org
These organizations confirm that:
- Polyaspartic systems do not resist high vapor pressure alone
- A moisture-mitigating primer is required when moisture is elevated
3. Required Mitigation for High-Moisture Slabs
In South Florida, many slabs exceed this threshold.
Industry best practice requires:
- Moisture Vapor Barrier (MVB):
Epoxy moisture-mitigating primer - Additional Testing (ASTM F2170):
https://www.astm.org/f2170
RH above 75–80% → requires mitigation
What This Means for Homeowners
👉 Most garage floors in South Florida require a proper moisture barrier system.
However, many installers:
- Complete jobs in one day without a primer
- Apply coatings directly to concrete
- Skip moisture testing
The result:
- Floor looks great initially
- But is prone to early failure
The Role of Flakes: More Than Just Looks
👉 You can explore available options on our floor color design page
Decorative flakes:
- Show brilliant colors
- Add slip resistance
- Increase durability
- Improve appearance
Professional Flake Scraping
After flakes are applied:
- Excess flakes are removed
- Surface is evenly scraped
This ensures:
- Proper texture
- Safe, slip-resistant surface
Polyaspartic Topcoat: The Protective Shield
Benefits
- UV stable (no yellowing)
- Chemical resistant
- High gloss retention
- Impact and abrasion resistant
- Fast curing (ready next day)
- Low odor
How to Maintain Your Beautiful Garage Floor
Everyday Cleaning
- Use a large broom or leaf blower
Periodic Cleaning
- Rinse with water
- Use a strong bristle broom brush
Stain Removal
- Use Dawn or similar cleaner
- Scrub with a deck brush
Rust Removal
- Use Zep rust remover (available at Home Depot)
👉 https://www.homedepot.com

It took only a couple of minutes to remove the old dried paint from the floor. A strong bristle brush and a quality cleaner easily restore the surface.
How Long Will Your Garage Floor Last?
A properly installed system will last 20+ years.
- Polyaspartic won’t yellow
- Flakes won’t fade
- Surface remains durable
- The floor will not peel when properly installed with a moisture barrier system
Lifetime Transferable Adhesion Warranty
Our system:
- Bonds permanently to the concrete
- Prevents peeling and bubbling
We guarantee:
- No peeling
- No bubbling
And the warranty transfers to the next homeowner.
Final Thought: What You Don’t See Matters Most
A garage floor is only as good as what’s underneath.
Without a proper moisture barrier…
👉 It will fail.
With the right system, your garage floor becomes:
- Beautiful
- Durable
- Low maintenance
- Built to last decades